Smith Fracture: Step-by-Step Surgical Approach, Reduction and Volar Plate Fixation
Orthopaedic surgical guide | Distal radius trauma | Modified Henry approach | Surgical anatomy and postgraduate revision
1. What is a Smith fracture?
A Smith fracture is a fracture of the distal radius in which the distal fragment is angulated or displaced toward the palm (volar side). It is often termed a reverse Colles fracture. It may follow a fall on a flexed wrist or direct impact to the dorsum of the wrist. The classic Smith fracture is extra-articular; a volar Barton fracture is an intra-articular volar rim fracture with radiocarpal subluxation and needs a different fragment-specific assessment.
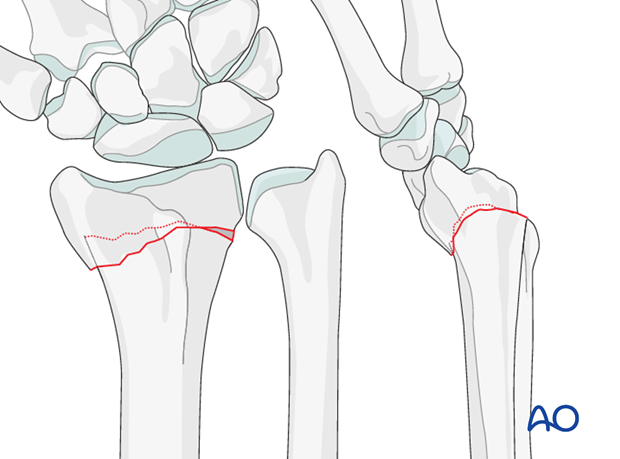
The distal radial fragment is displaced toward the volar side. This morphology can be unstable after closed reduction.
Image credit: AO Surgery Reference
Tap the illustration to open a larger view.
Diagnostic X-rays — Smith fracture examples
On a true lateral radiograph, identify the volar tilt or displacement of the distal fragment. Review the PA view for radial height, inclination, shortening and any associated ulnar injury. These are two separate clinical examples, not before-and-after images of the same patient.

X-ray A — AP and lateral
Extra-articular Smith fracture: assess the distal metaphyseal angulation and alignment on both views.
Source: Hellerhoff, Wikimedia Commons (CC BY-SA 4.0).

X-ray B — Alternative case
Left wrist Smith fracture: compare the distal fragment on lateral projection and examine the PA projection for associated injuries.
Source: James Heilman, MD, Wikimedia Commons (CC BY-SA 4.0).
Images are thumbnails linked to full-resolution radiographs; open by clicking. Credit and license links accompany each image.
2. Initial assessment and indications for surgery
Inspect the skin and swelling, assess digital perfusion and document median, ulnar and radial nerve function. Obtain AP and true lateral wrist radiographs, using CT if intra-articular extension, volar lunate facet injury or complex comminution is suspected.
Not every Smith fracture requires surgery. Closed reduction and immobilization can be appropriate for stable fractures that maintain acceptable alignment. Consider ORIF for substantially displaced or unstable fractures, recurrent loss of reduction, irreducible displacement, clinically important articular incongruity, associated carpal/DRUJ instability, or other injuries necessitating operative management. Progressive acute median nerve compression requires prompt reassessment and urgent management.
3. Preoperative planning
- Review true AP and lateral X-rays for height, inclination, translation and volar tilt.
- Define the number of fragments and evaluate the radiocarpal joint and DRUJ.
- Consider CT if the volar marginal rim or lunate facet is involved.
- Check anaesthetic suitability, consent, antibiotic protocol and tourniquet precautions.
- Prepare a suitable volar locking plate system, reduction clamps, fine hook, K-wires and C-arm.
| Parameter | Approximate normal adult value |
|---|---|
| Radial inclination | 22–23 degrees |
| Radial height | 11–13 mm |
| Volar tilt | About 11 degrees |
| Joint congruity | No residual step-off where achievable |
4. Modified Henry volar approach — operative steps
Step 1 — Position and prepare the patient
Position the patient supine, place the forearm on a radiolucent hand table, and supinate the forearm. Use appropriate regional or general anaesthesia, apply a tourniquet when indicated, give prophylactic antibiotics and arrange fluoroscopy for true AP and lateral images.
Step 2 — Mark and make the incision
Palpate the flexor carpi radialis (FCR) tendon, the radial styloid and the wrist crease. Make an approximately 6–8 cm longitudinal incision along the radial border of FCR, extending as fracture exposure requires. Avoid a perpendicular crossing of the volar wrist flexion crease.
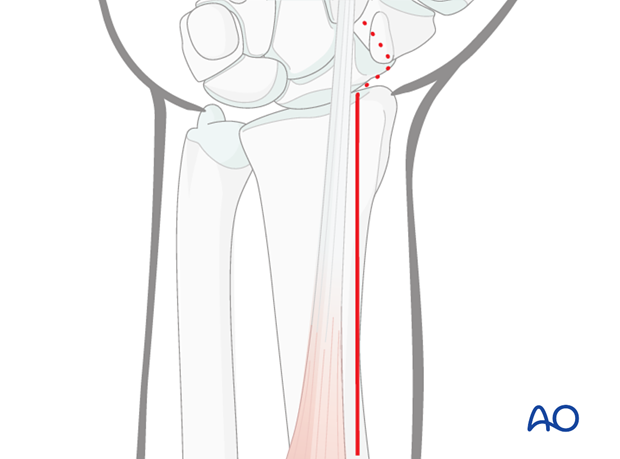
The approach is based on FCR, rather than a broad blind midline volar wrist dissection.
Image credit: AO Surgery Reference
Step 3 — Open the FCR sheath and develop the interval
Divide subcutaneous tissue with careful haemostasis. Open the superficial FCR sheath in line with the tendon. Retract FCR toward the ulna and incise the deep sheath. Progress between the radial artery (radial side) and the FCR/FPL structures (ulnar side). Protect the palmar cutaneous branch of the median nerve.
Anatomical distinction: The modified Henry approach is ulnar to the radial artery; the classical Henry approach proceeds radial to the artery in the interval toward brachioradialis.
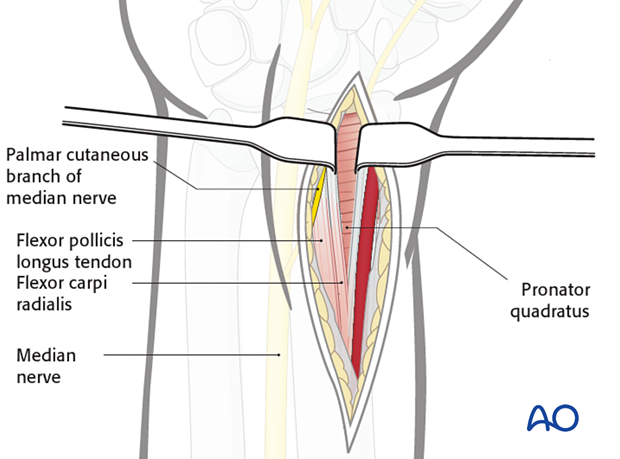
Know the radial artery and palmar cutaneous branch of the median nerve before deepening the wound. Retract gently and under vision.
Image credit: AO Surgery Reference
Step 4 — Expose pronator quadratus
Gently sweep flexor pollicis longus (FPL) toward the ulna. This exposes the pronator quadratus muscle on the volar distal radius. Maintain limited, atraumatic retraction and protect the radial artery throughout.
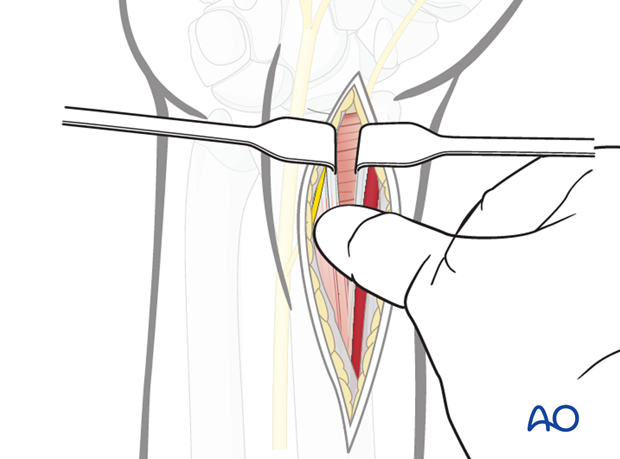
A finger sweeps the FPL muscle belly toward the ulna to create the deeper window. The exposed red muscle is pronator quadratus. Avoid excessive retraction, particularly of the radial artery.
Image source: AO Surgery Reference — 23_A150_i080.
Click image for enlarged original.
Step 5 — Elevate pronator quadratus
Make an L-shaped incision along the radial and distal borders of pronator quadratus, keeping a repairable cuff. Elevate the muscle subperiosteally toward the ulna to expose the distal radius and fracture. Preserve the volar radiocarpal capsuloligamentous attachments unless articular exposure is specifically required.
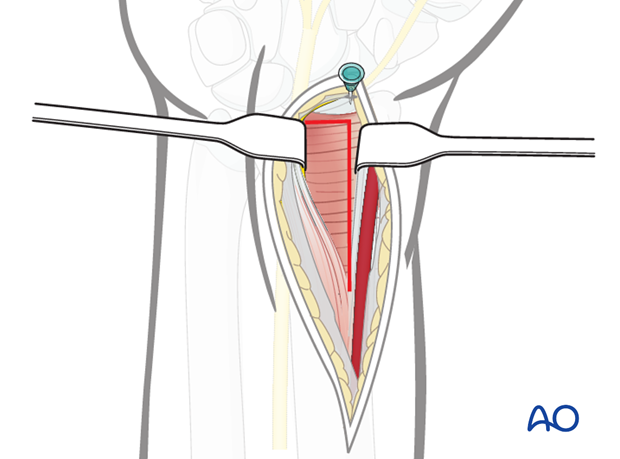
The L-shaped release is placed with the distal limb near the watershed region. Leave adequate tissue for coverage of the plate at closure.
Image credit: AO Surgery Reference
5. Reduction of the Smith fracture
Step 6 — Unlock the impaction and restore alignment
- Expose the fracture while preserving viable soft-tissue attachments.
- Gently accentuate the existing palmar angulation to disengage impacted fracture surfaces.
- Apply longitudinal traction and suitable distal pressure on the metaphyseal fragment.
- Progressively extend the hand and wrist to reverse the palmar deformity.
- Refine fragment alignment using direct manipulation with a small hook or dental pick if necessary.
- Use C-arm imaging to verify radial length, inclination, translation and volar tilt.
Step 7 — Temporary K-wire fixation
Once the reduction is satisfactory, insert a smooth temporary K-wire from the radial styloid across the fracture into an appropriate opposite cortex, confirming position on fluoroscopy. Remove the temporary wire after stable plate fixation.
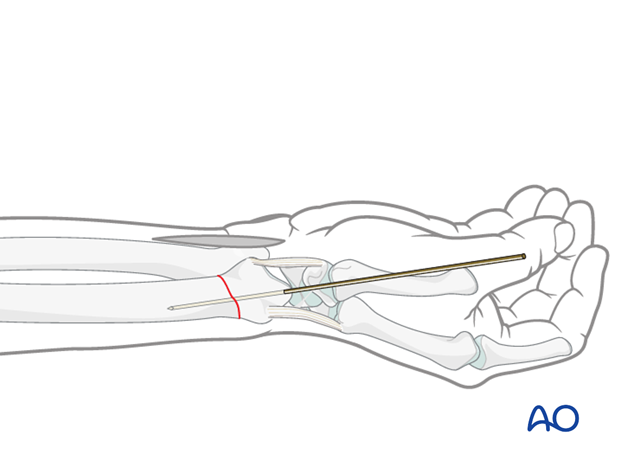
A temporary radial styloid K-wire helps hold the reduction until definitive plate fixation is complete.
Image credit: AO Surgery Reference
6. Definitive volar plate fixation
Step 8 — Position the volar buttress / locking plate
Select an appropriate anatomically contoured plate. Position it to support the distal fragment without placing the distal plate margin excessively beyond the volar watershed zone, because distal prominence increases risk of flexor tendon irritation (notably FPL).
Step 9 — Start with the proximal oblong hole
For the AO extra-articular volarly displaced pattern, place a cortical screw through the elongated proximal hole, initially leaving room for fine adjustment. Confirm plate alignment under fluoroscopy, then tighten the screw once satisfactory.
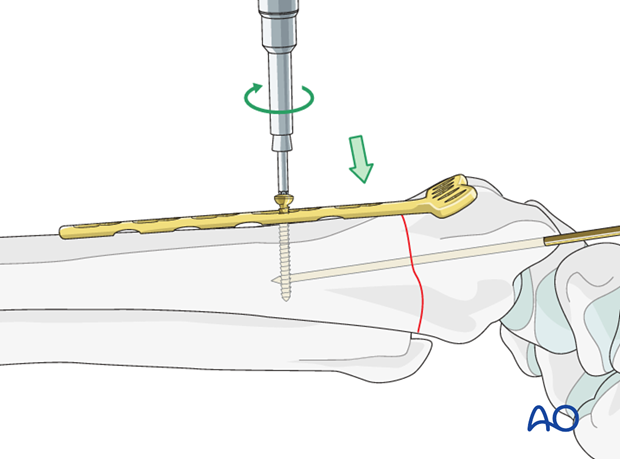
The proximal oblong hole allows fine correction of plate position before it is secured.
Image credit: AO Surgery Reference
Step 10 — Distal locking screws, then remaining proximal screws
Confirm the position of the distal row beneath the subchondral bone. In the AO illustrated technique, start with an ulnar-sided distal locking screw; a radial-side screw placed first can obscure the imaging of ulnar screw placement. Complete distal fixation with sufficient locking screws/pegs appropriate for fracture geometry and the plate system. The AO example describes at least three distal locking screws followed by two further proximal screws. Finally remove the temporary K-wire.
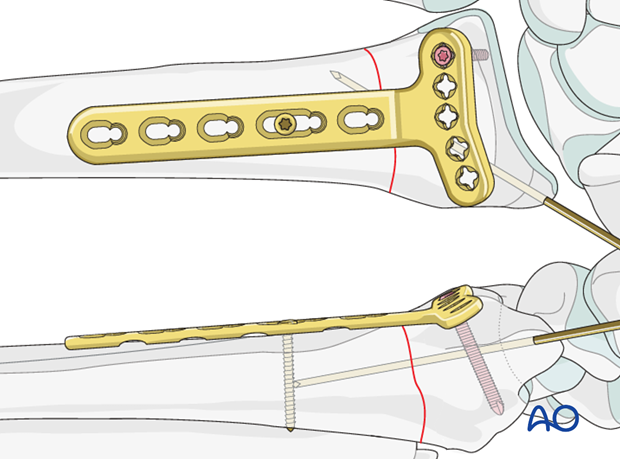
Check distal screw trajectories carefully to avoid intra-articular penetration and dorsal extensor tendon injury.
Image credit: AO Surgery Reference
Post-fixation radiographic example
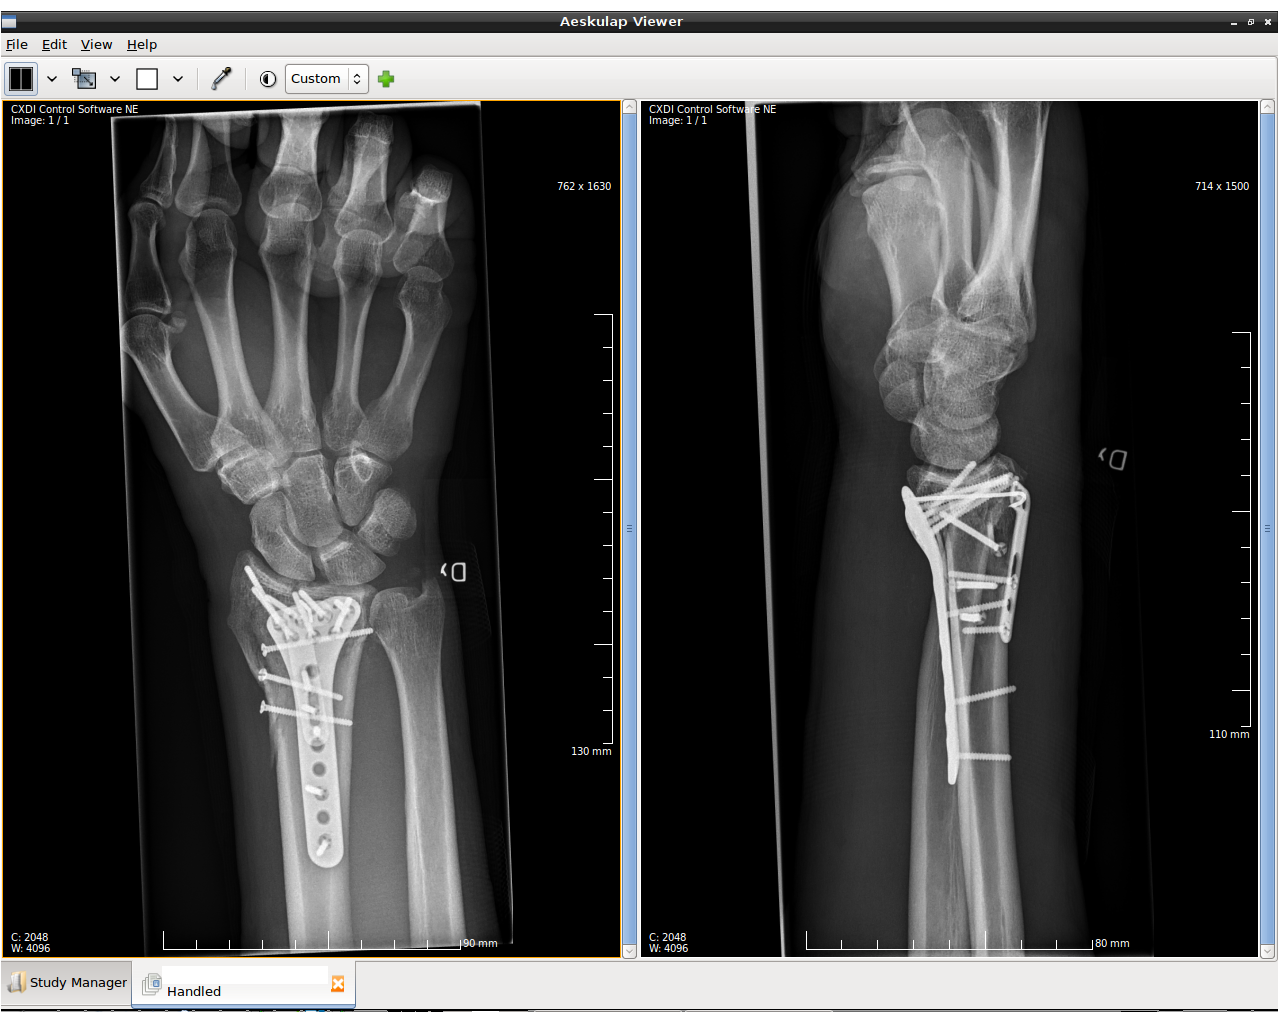
Illustrates orthogonal views for checking reduction, plate alignment and screw locations. Not a pre/post series with the Smith fractures shown above and not necessarily a classic Smith pattern.
Credit: DavidIvar, Wikimedia Commons (CC BY-SA 4.0).
7. Mandatory intraoperative checks
- AP view: radial length, inclination, translation and plate position.
- True lateral: volar tilt and plate position relative to the watershed region.
- Tilted/oblique projections: exclude screw penetration of radiocarpal articular surface; AO describes an approximately 20-degree oblique sagittal beam in its technique.
- Dorsal tangential or skyline view: inspect for dorsal screw prominence that may injure extensor tendons.
- Clinical test: gently move the wrist through safe range and assess DRUJ stability in pronation, neutral and supination after radius fixation.
8. Irrigation and closure
Irrigate the wound, release the tourniquet if used and secure haemostasis. Inspect the plate position and ensure flexor tendons are not abraded by prominent hardware. Reposition and repair pronator quadratus over the plate when feasible without undue tension. Close the sheath and skin with care to protect the palmar cutaneous branch of the median nerve. Apply sterile dressing and an appropriate protective volar splint if indicated by fixation stability and soft-tissue condition.
9. Postoperative rehabilitation
- Immediately: elevate the hand, assess neurovascular status and encourage active finger, elbow and shoulder motion.
- First 7–14 days: wound review, dressing/suture management and radiographs as indicated. Some surgeons use 7–10 days of short-term wrist immobilization.
- Once wound and fixation allow: supervised active wrist flexion/extension, radial/ulnar deviation and pronation/supination, usually after short protective immobilization.
- At approximately 6 weeks: progress strengthening/resisted activity if clinical and radiographic healing are satisfactory.
- Later: work/sport progression according to healing, functional demands and the treating surgeon's protocol.
10. Complications to prevent and recognize
| Complication | Mechanism / prevention |
|---|---|
| Radial artery injury | Injury during deep dissection; identify and gently retract the artery. |
| Palmar cutaneous median nerve injury | Injury near the ulnar FCR border; avoid blind dissection and entrapment at closure. |
| FPL irritation or rupture | Distally prominent volar plate; respect the watershed region and investigate postoperative flexor pain or crepitus. |
| Extensor tendon irritation/rupture | Dorsal screw prominence; assess with dorsal tangential imaging. |
| Intra-articular screw | Incorrect screw trajectory or length; use multiple fluoroscopic views. |
| Malreduction or loss of reduction | Failure to restore length/tilt or unstable fixation; obtain satisfactory reduction before completing fixation. |
| DRUJ pain/instability | Residual malalignment, ulnar/TFCC injury; assess after radius fixation. |
| Stiffness, CRPS, infection | Early recognition, appropriate wound care and staged rehabilitation. |
11. High-yield surgical revision notes
Quick revision arranged in the same sequence as the operation. These are key facts, not a second question bank.
1. Approach and surgical anatomy
- Exposure: Modified Henry volar approach; work in the interval between FCR and the radial artery.
- Structures at risk: Protect the radial artery radially and the palmar cutaneous branch of the median nerve near the ulnar FCR border.
- Deep exposure: Retract FPL gently ulnarly to expose pronator quadratus; elevate PQ using a repairable L-shaped release.
2. Reduction and definitive fixation
- Disimpaction: Unlock impacted volar deformity with controlled manipulation before restoring length and sagittal alignment.
- Reduction goals: Restore radial height, inclination, volar tilt and articular congruity; check both AP and true lateral views.
- Plate technique: Confirm volar plate position, obtain temporary stability when needed, then place distal subchondral support and shaft fixation appropriate to the fracture.
3. Intraoperative imaging and stability
- Screw safety: Use appropriate oblique/tilted and dorsal tangential views to exclude joint penetration and dorsal screw prominence.
- DRUJ: Assess distal radioulnar joint stability after radius fixation in pronation, neutral and supination.
4. Complications and prevention
- Flexor tendons: Avoid excessive distal plate prominence at the watershed region, especially near FPL.
- Extensor tendons: Avoid dorsal screw protrusion that can irritate or rupture extensor tendons.
- Follow-up: Recognize median neuropathy, stiffness, infection, CRPS and loss of reduction promptly.
12. Surgical viva — clinical decision questions
Questions follow the operative pathway. Tap a question to reveal the clinical reasoning.
Preoperative planningA lateral X-ray suggests a volar lunate facet fragment. What should you check before selecting a plate?
Assess the size and position of the volar marginal fragment, consider CT to define articular anatomy, and choose a fixation strategy that reliably captures the fragment. A standard volar plate may not control a very distal small rim fragment.
Approach selectionWhat would make you extend or modify the standard volar exposure?
Complex articular fragments, a very distal volar rim fragment, or inadequate visualization may require tailored exposure or fragment-specific fixation. Preserve important vascular, nerve and ligament structures.
ReductionAfter traction, the distal fragment still cannot be reduced. What is your next step?
Reassess for impaction, soft-tissue interposition or an unrecognized fragment. Disimpact gently under direct vision and fluoroscopy; avoid forceful repeated manipulation.
FixationThe volar lunate facet fragment remains unstable after standard plating. What is the concern?
Loss of volar ulnar corner support can lead to volar radiocarpal subluxation. Consider fragment-specific support or supplementary fixation appropriate to the fracture pattern.
ImagingThe AP and lateral views look acceptable, but a dorsal screw tip may be long. How do you confirm?
Obtain a dorsal tangential/skyline view and adjust screw length if prominence is seen; routine views may miss dorsal cortical penetration.
DRUJ assessmentThe DRUJ remains unstable after radius fixation. What should be checked first?
Confirm accurate radial reduction, length and sigmoid-notch alignment; then assess ulnar styloid/TFCC injury and compare stability across forearm rotation.
Postoperative complicationSeveral weeks after surgery, the patient develops painful thumb flexion and volar crepitus. What must you exclude?
FPL irritation from a prominent distal volar plate or screw. Assess urgently because continued attrition may lead to tendon rupture.
RehabilitationWhen can wrist motion begin after fixation?
Timing depends on fixation stability, fracture pattern, soft-tissue condition and surgeon protocol. Encourage early finger movement and initiate protected wrist motion when clinically appropriate.
13. Smith Fracture — Interactive 20-Question Mock Test
All questions are together at the end of the article. Only one question appears at a time. Select A–D for immediate marking and a complete explanation, then choose Next Question. Answers are hidden until you choose. Results and progress are saved on this browser.
Ready for the complete mock?
20 questions covering surgical anatomy, modified Henry approach, reduction, volar plating, imaging, complications and clinical scenarios. Your last attempt can be resumed.
Question 1 of 20
Select an answer to unlock Next Question. You can review previous answers but cannot change them without resetting.
Start a new attempt? All 20 saved responses, score and current position will be cleared on this browser. This cannot be undone.
- AO Surgery Reference — ORIF, palmar plate, volarly displaced distal radius fracture.
- AO Surgery Reference — Modified Henry approach.
- Orthobullets — FCR approach to distal radius.
- AAOS/ASSH — Distal radius fracture clinical practice guideline summary.
- NSW Emergency Care Institute — Smith's fracture.
AO operative illustrations are linked from AO Foundation and require permission for reuse/hotlinking. The three radiographic examples are licensed CC BY-SA 4.0 and link to their authors, license and source pages; retain the attribution and follow share-alike requirements for adaptations. External image visibility depends on the source remaining online. This article is a teaching aid for appropriately trained clinicians, not a substitute for supervised operative practice or patient-specific surgical judgment.

0 Comments